~/How I use my Stream Deck
27 December 2022
I bought myself an Elgato Stream Deck MK2 a few weeks ago. I didn’t have a big need for one but I had some credits on Amazon so it didn’t end up costing much. I also wanted to play around with a macro pad, as I use a number of different applications for knowledge management and development, and I often found it frustrating having to figure out the right shortcuts or have to navigate menus to do the same thing in each app.
I’ve always had a thing for macro pads. Many years ago I used AutoHotKey to convert a MS Sculpt numpad into a media and macro pad, and I also built avery dodgy stomp box around an Arduino Nano that used AHK to automate some annoyingly repetitive Visual Studio actions.
In this post I’m going to talk a bit about how I’ve configured the deck (and made some tweaks in MacOS) and how I use it. Obviously I’m using some specific applications and I’m working on a Mac but hopefully some of this will be relevant to other platforms.
I’ve spent a bit of time customising the deck since I recieved it, and I’ve well and truly fallen in love with it. The amount of time I’ve saved has more than paid for the time I’ve spent configuring it already. It’s my new best friend. If Elgato ends up making a Stream Deck XL in white (very important) I would probably upgrade, and move this smaller one into my music room to make working with Logic Pro easier. At the moment, although at some point I’ll need to add paging to some of the screens, I’ve covered everything I need without requiring a larger deck.
About the deck itself
I won’t go into a big review of the hardware or even the software itself, but here’s a quick run-down.
The hardware is extremely pretty and well-made. The deck looks lovely on my desk. The button LCDs are a little pixellated but it’s barely noticable during use, and I think it adds some charm anyway. Animated GIFs for the button images are a nice touch although sometimes the movement can distract me while I’m working on something—I’m easily distracted, the GIFs look great but it would be nice to have a global setting to turn off animations globally. The buttons are a little squishy but satisfying and give pretty good tactile feedback. The only real criticism is that if I stab at a button it can shift the deck around the desk. That’s not usually a problem because I generally rest my hand on the top of the deck and navigate with my thumb instead.
The software used to configure and operate the deck is ok, but I’ve noticed a few UX bugs like configuration options not working properly. A glaringly obvious issue is putting multiple lines on a title; the input control is a single line, and if you press <Enter> to add a second line the control doesn’t resize. There are some third-party plugins that don’t work reliably or at all (obviously not Elgato’s fault and I’m not going to critique free OSS plugins that someone has spent their time writing and maintaining). It can sometimes be hard to find a good icon, however it is really easy to download an image from the internet and select it for a button.
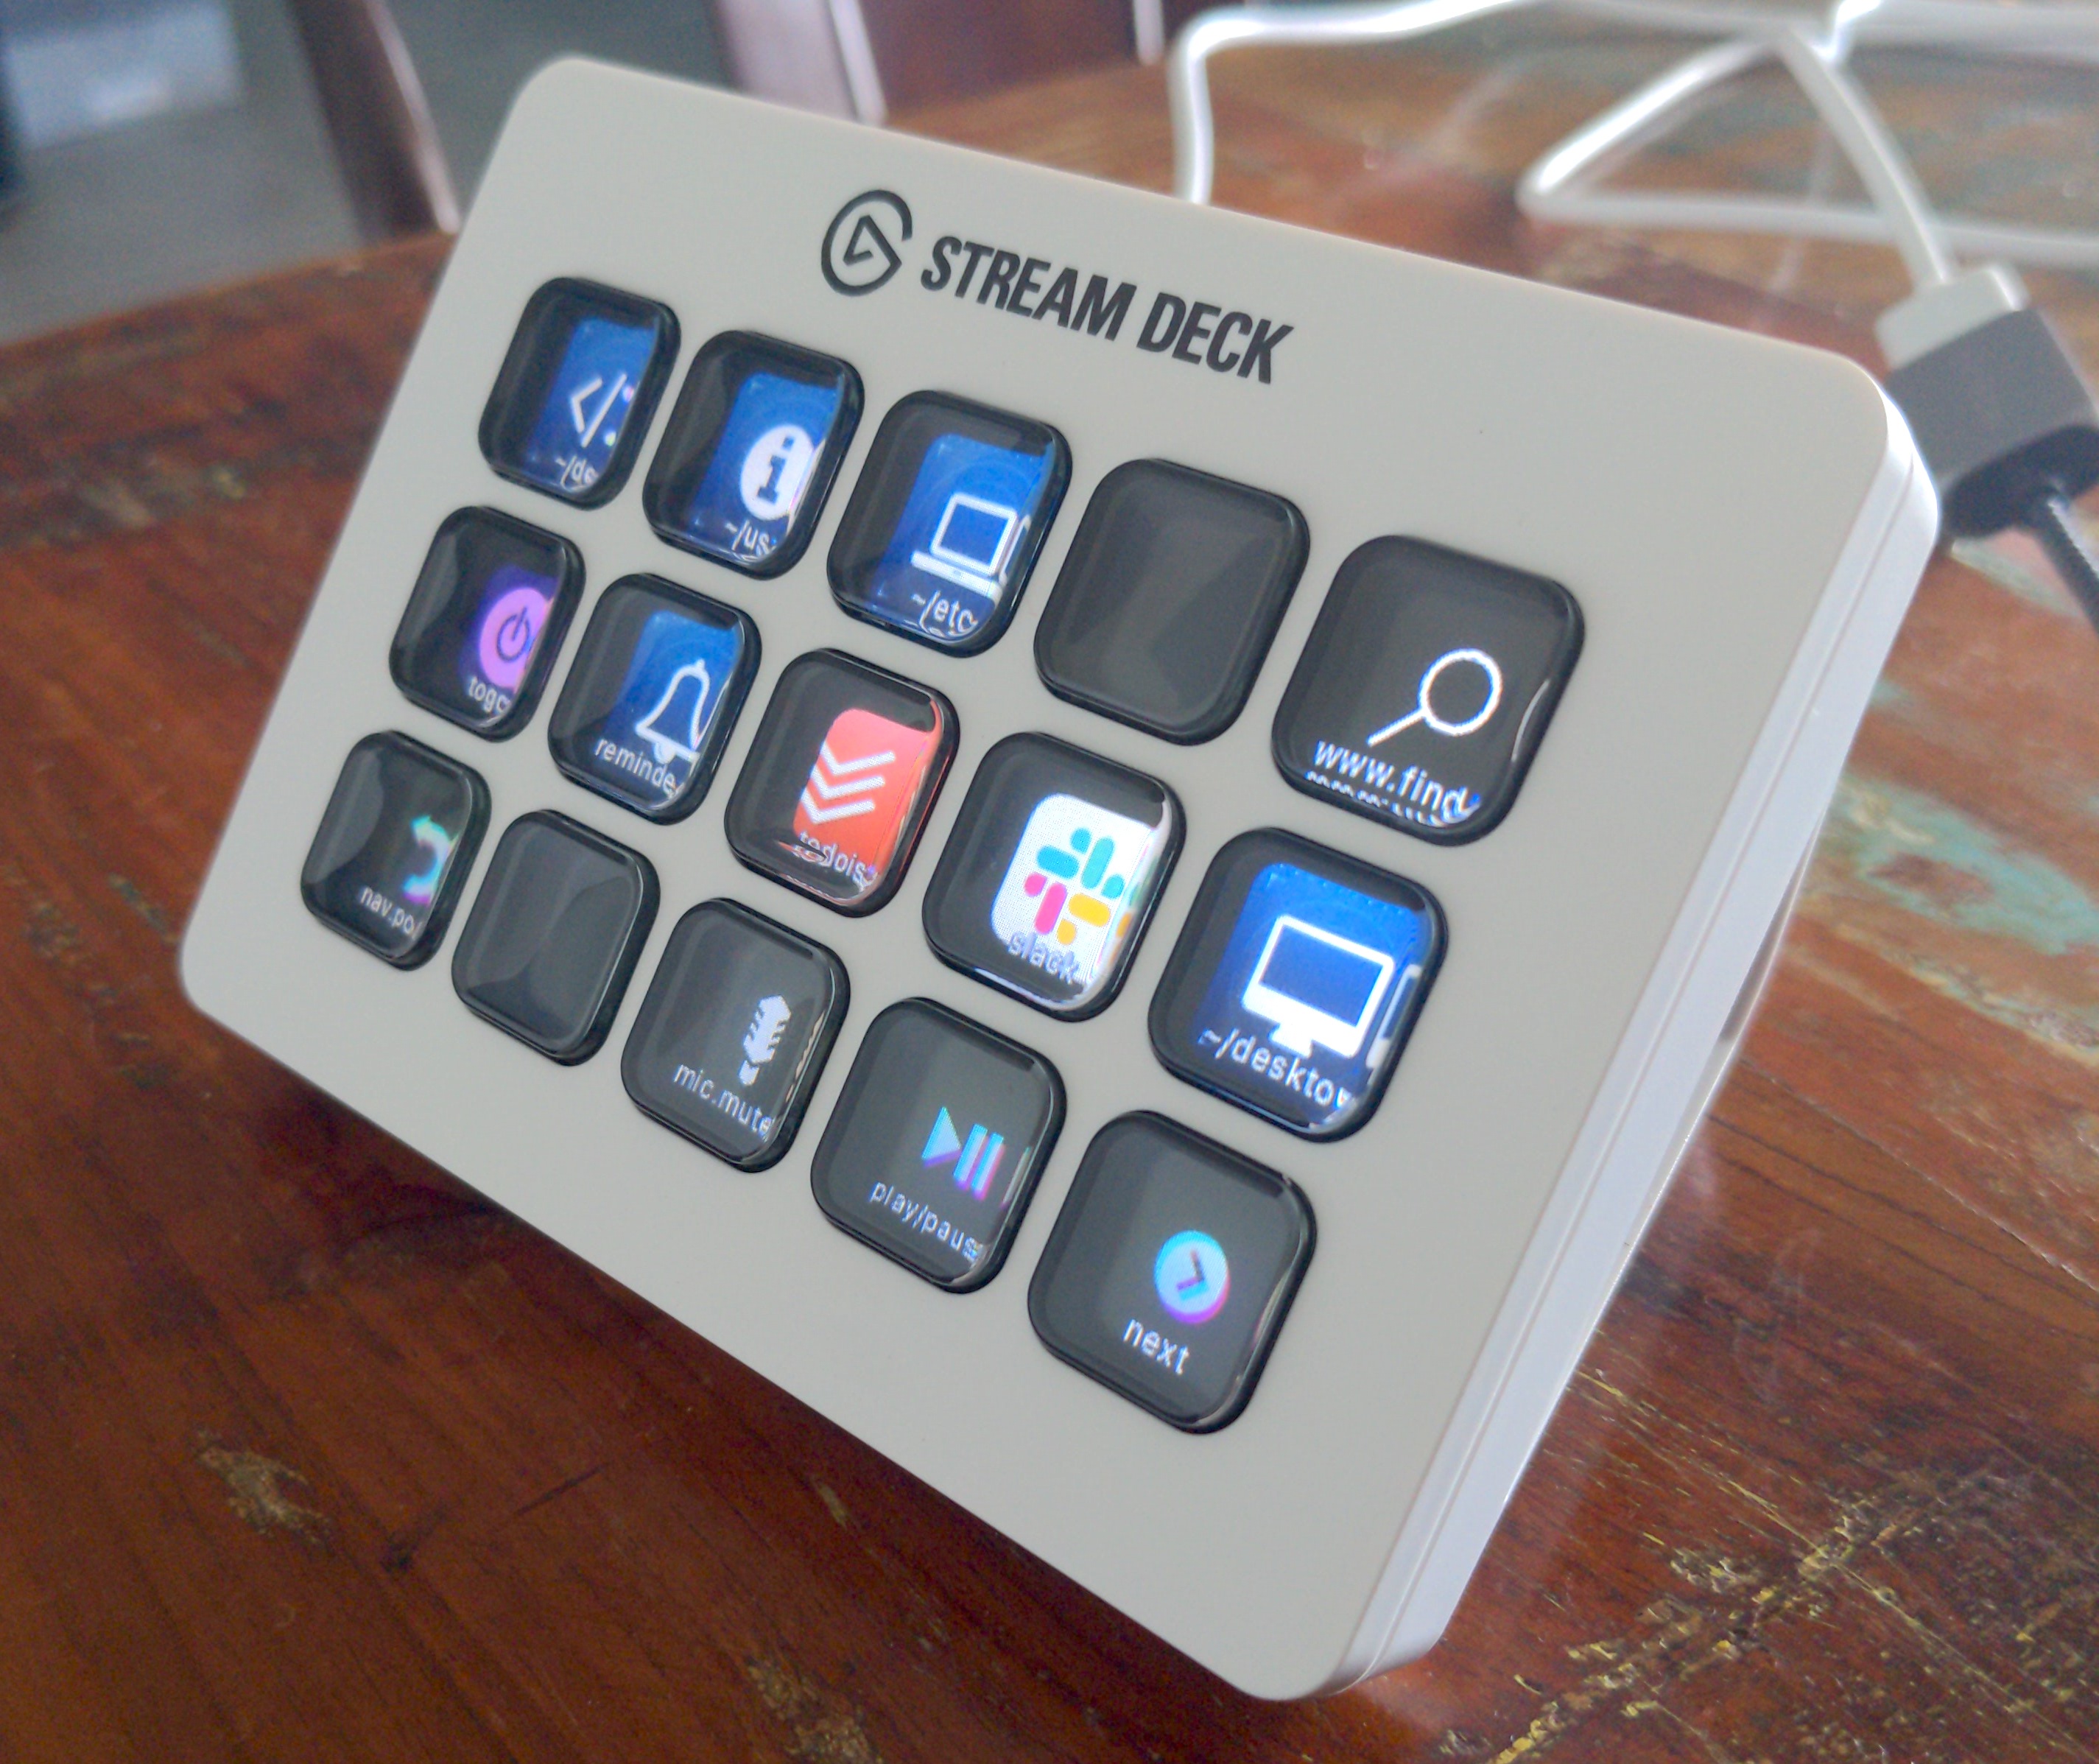
The front page

The front page is a mixed bag of functionality, including a few folders, links to apps, and some media controls.
I got a little nerdy with the icons, although I haven’t stuck to a consistent theme because it’s pretty difficult to find good icons if you’re not using this for streaming games (i.e. what the Stream Deck was made for 😅). I also got a bit nerdy with the button titles, but I found that easier than being too descriptive and running out of room.
The top row starts off with three folder links - ~/dev is development tools, ~/usr is knowledge and information management, and ~/etc is another little mixed bag. Then there’s a www.find() button, which is a multi-action that opens Chrome then does ⌘ T to open a new tab—Chrome automatically focuses the nav bar, so I can whack www.find() and start typing to search the web.
The second row has quick links to things I need easy access to:
- App launcher for toggl
- A really simple time tracking tool
- I don’t need to track every minute for work, but this helps me remember what I did through the day and for how long
- Having the button right there makes it easier to remember to start tracking time
reminder++launches a MacOS Shortcut that lets me set a meeting reminder, I’ll explain this below- App launcher for Todoist
- I enter todos on the Todoist mobile app, and they automatically come up on the desktop, and all I really do with this on the desktop is move the todo out of Todoist into another task tracking method (either Obsidian or in a paper journal), so it’s just a way of being able to remember things when I’m mobile
- App launcher for Slack
~/desktopis a hotkey -^ 1, which needs to be enabled in MacOS first:- Open System Preferences
- Open Keyboard
- Open Shortcuts
- Find
Mission Control -> Switch to Desktop 1and enable it
The third row:
- I can never remember the Chrome shortcut for navigating back a page, so
nav.pop()is just a hotkey for⌘ [, which obviously only works in Chrome mic.mute()is the Toggle Mute action, which I use to mute the default microphone if I need to cough or whack my mechanical keyboard while I’m on a call- Note: if you’re muted and you use Siri, Siri helpfully unmutes the microphone gloally (of course) so everyone in the call can hear you shouting obscenities at Siri…
play/pauseandnextare the media controls you would expect
reminder++
I was pretty stoked with getting this working. I have a terrible habit (it’s more poor time sense) where I know that I’ve got ten minutes before a booked-in call (I get a 15 minute reminder from Outlook and on my phone) and I start on something and get distracted, and next thing I know people are pinging me five minutes into the call wondering where I am. It’s very embarrassing and potentially unprofessional.
It would be possible to write an IFTTT action to hook into an iCal feed and turn a light on or something when a calendar appointment is a minute away. Or I could find one of the many unused Raspberry Pis that I’ve got piled up out in my shed, hook it up to a relay, and write some Python. But that seems like a lot of work.
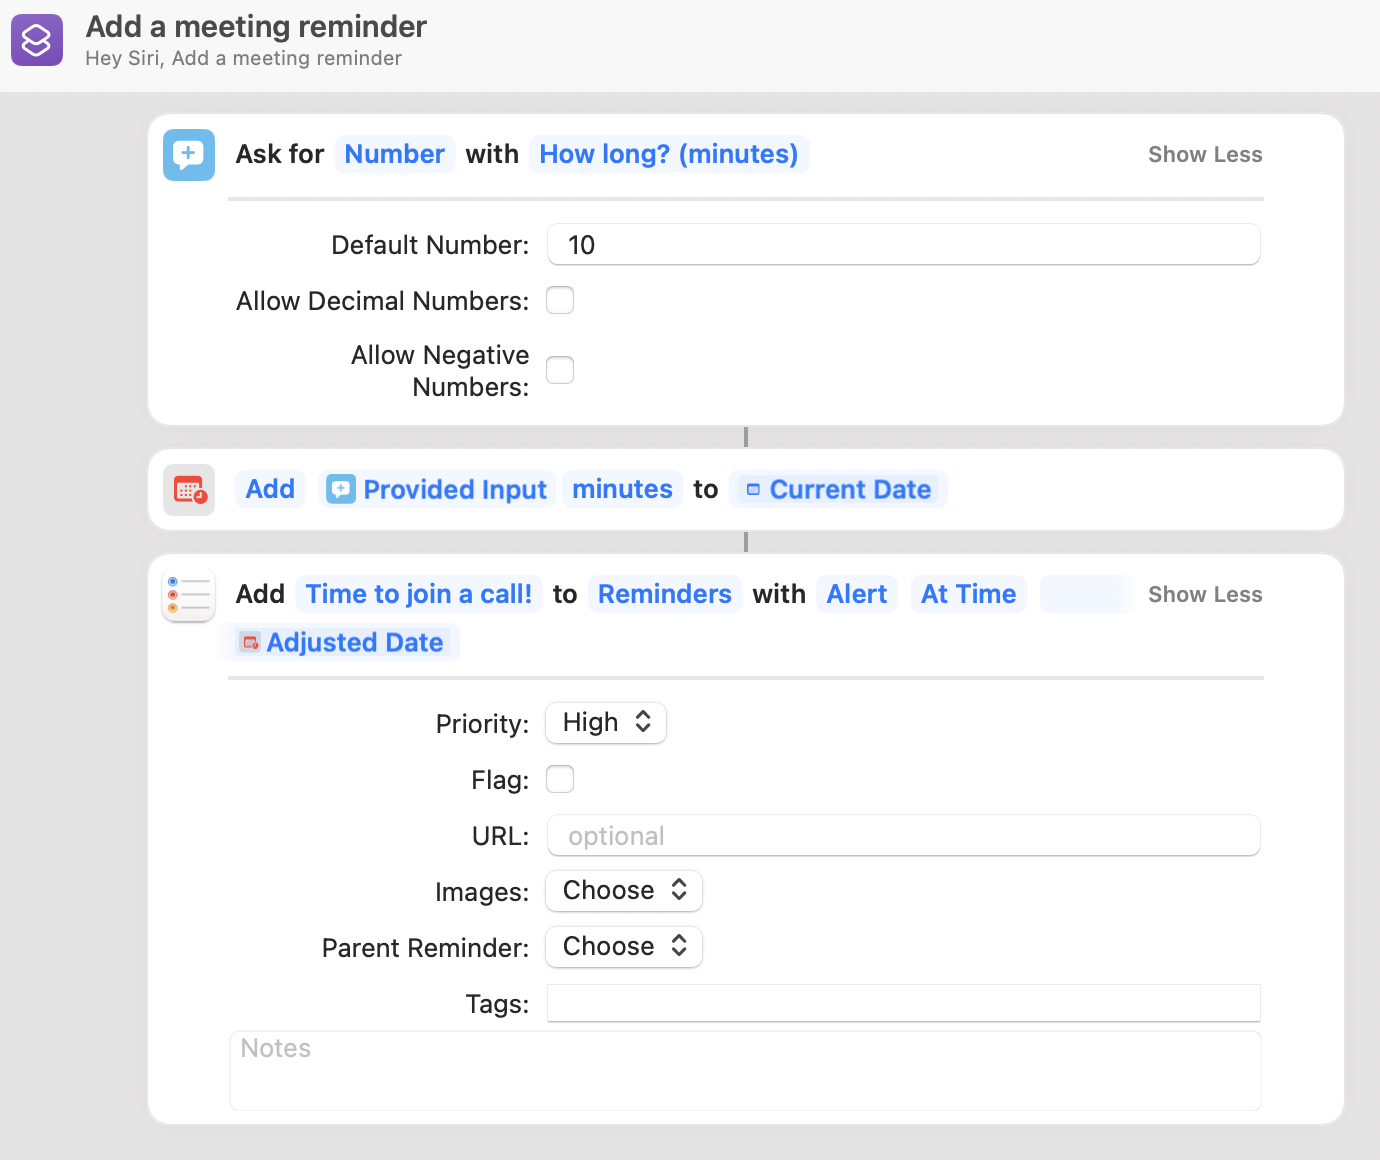
So what I did was create a Shortcut. This is a relatively new feature in MacOS that lets you drag and drop things around to create a script that can perform some pretty complex actions.
The shortcut I created prompts for the number of minutes until the meeting starts, then uses the Reminders app to create a high priority reminder at that time. When the reminder goes off it makes a reasonable noise and shows a notification on screen. I’ve found that I don’t miss it, which is great.
Shortcuts are integrated with Siri too, so I can actually say “Hey Siri, set a meeting reminder”, Siri asks “How long (minutes)?”, I can just say “Five”, and the reminder is created.
But if I’m already on a call, or just don’t feel like talking to the computer, I can hit the reminder++ button on the deck. Launching a Shortcut from Stream Deck requires the third-party Shortcuts plugin, but once it’s all set up and talking to each other, this works beautifully and has already saved my skin a number of times.
Development tools

These are tools and IDEs that I often use for parts of my work. There’s a bit of variety because I work in some different technologies and across different platforms. Most of the buttons on this page are app launchers—iTerm 2, Fork, GitHub Desktop, Android Studio, XCode, and Azure Data Studio.
The other three are folders—Rider, Visual Studio for Mac, and VS Code. I’ve given them their own folders because I use them a lot and I’ve got some macros that I like for each application.
Rider and VS Mac are basic at the moment, they just have an app launcher to open the relevant IDE, and a hotkey to split the screen (which is how I like to work a lot of the time).
In VS Code, I’ve managed to create a few more shortcuts—partly because I’ve used it most since getting the deck, and partly because I’ve found it a bit easier to find shortcuts within the IDE to work with. These are actions like moving an open editor from the left pane to the right pane or vice versa, or collapsing all the explorer nodes.
The <-- move left button, for example, is a multi-action:
- Hotkey:
<Shift> ⌘ Pto open the command palette - Text
move editor into left groupthen<Enter>, which finds and executes the relevant command
I’ve found that if an application has a command palette it can be a lot easier to automate and create a macro for, as opposed to trying to figure out or customise hotkeys for an action that is more obscure.
I’ve also got a handy button called insert post f/m. This inserts the front-matter for a Jekyll page, which is handy for writing a post for this very blog :-). Integrating TextExpander (which has a lot of very rich text macro features) would be ideal for this, however at the moment I don’t have many cases where I would really need TextExpander. When this changes I’ll look at it again.
Knowedge and information management
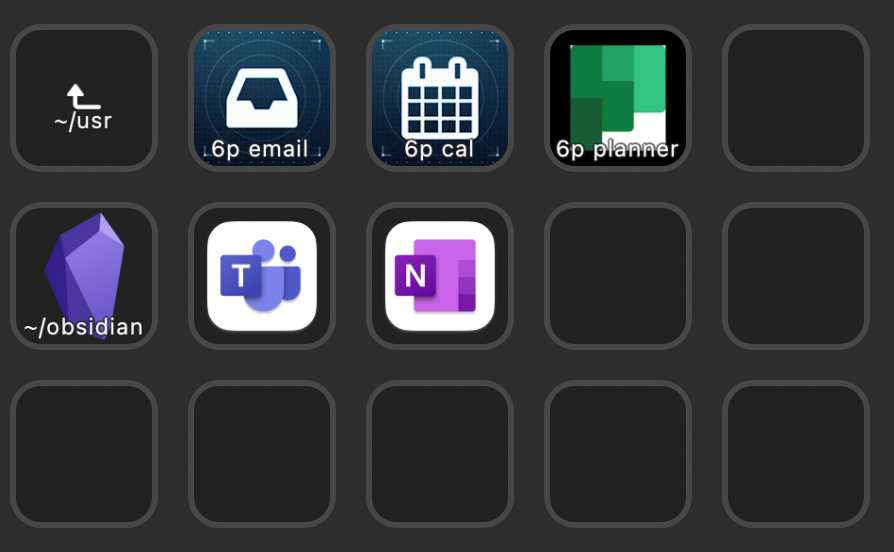
The top row are web links to my work email, calendar, and MS Planner (where I do post-it style management of my long-term, ongoing projects).
The second row are app launchers for Teams and OneNote, both of which I use for managing documents and comms for clients and some internal projects. Everything there ends up living on SixPivot’s SharePoint.
The first button on the second row is the ~/obsidian folder. I do a lot of my work in Obsidian, from writing meeting notes, managing TODO lists, storing files from clients (usually these go in SharePoint too), and writing the bulk of the content for anything I’m producing.
Obsidian
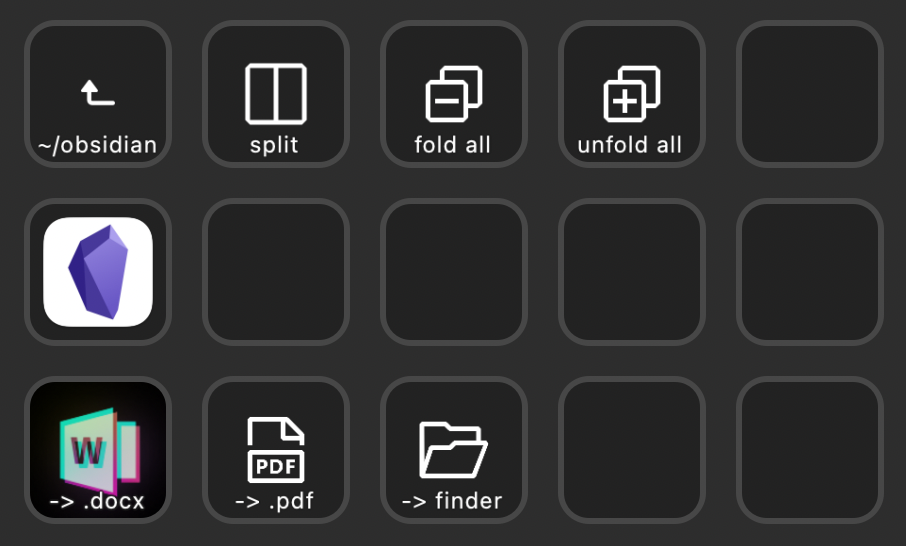
I have a few screen management actions:
splitis a multi-action:- Hotkey
⌘ Pto open the command palette - Text
split rightthen<Enter> - Hotkey
⌘ Wto close the current tab, because Obsidian duplicates the current file tab when splitting it
- Hotkey
fold allandunfold allare multi-actions that collapse and expand the headers in the document:- Hotkey
⌘ Pto open the command palette - Text:
fold all(orunfold all) then<Enter>
- Hotkey
And I’ve got a few cool actions on the bottom row.
The first requires the Obsidian Pandoc plugin, which enables exporting the current document in a number of different formats. The one I want is .docx, so I can do final editing of a document in Word. The plugin requires Pandoc to be installed. I think I just used Homebrew. Then you need to set the path to Pandoc in the plugin’s settings; it should just be /usr/local/bin/pandoc. The --> .docx button is then a multi-action:
- Hotkey
⌘ Pto open the command palette - Text
pandoc wordthen<Enter> - Hotkey
⌘ Pto open the command palette again - Text
reveal in finderthen<Enter>
This exports the current document as a .docx with the same title, in the same folder as the source document, and opens the folder in Finder.
The second action is kind of similar except it can use the built-in Obsidian feature to export to PDF. It’s also a multi-action:
- Hotkey
⌘ Pto open the command palette - Text
export to pdfthen<Enter>
The first time this is run a dialog will appear asking for some PDF export options.
The third action just opens the current document’s path in Finder, rather than right-clicking the file in the file list or having to use the command palette manually. It’s a multi-action:
- Hotkey
⌘ Pto open the command palette again - Text
reveal in finderthen<Enter>
~/etc, the kitchen sink
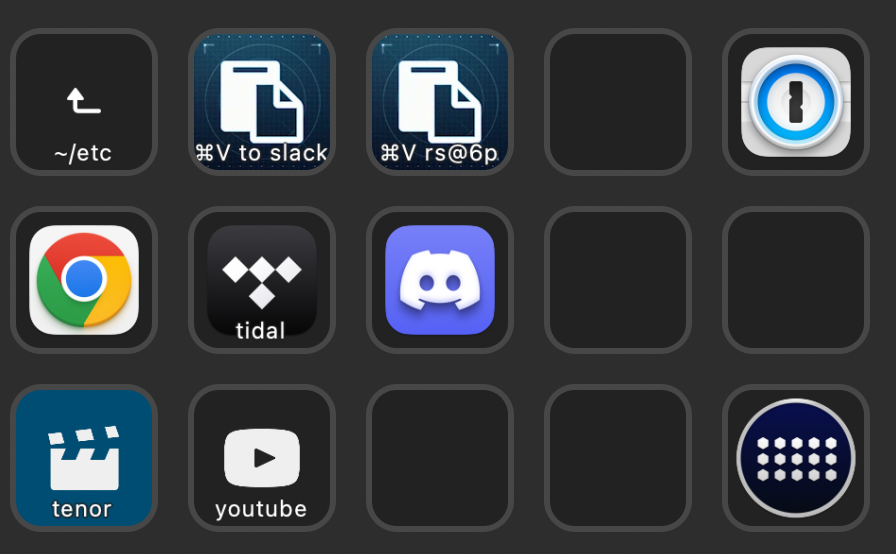
There’s some obvious app launchers on this page: 1Password, Chrome, Tidal, and Discord. The one all by its lonesome in the bottom right is the Stream Deck software, which I use quite a bit as I keep fine-tuning all this…
There’s also a couple of website launchers:
The more interesting ones are in the top row.. The second one, ⌘V rs@6p is pretty simple; it just writes out my work email address (rebecca.scott@sixpivot.com.au), because it’s a little long if I’m having to type it multiple times to sign up or log in to a service.
The first one (⌘V to slack) is a lot of fun. A lot of the time I want to be able to copy a link from my Mac to my phone or vice versa. If I had an iPhone that is just part of the OS, however I love my cheap, cracked, four year old Pixel. There are ways to kind-of share a clipboard but they require third-party apps and I just don’t know about them. My go-to is usually just opening one of my Slack workspaces and pasting stuff into my personal DM (i.e. @becdetat).
So to automate that I needed a multi-action:
- Open app
Slack - Hotkey
⌘ Kto open the Jump To dialog - Text
brisbane developersthen<Enter>(replace this with your favourite Slack workspace) - Hotkey
⌘ Kto open the Jump To dialog - Text
becdetatthen<Enter>(replace this with your username) - Hotkey
⌘ Vto paste the clipboard
This doesn’t press <Enter> after the clipboard has been pasted—this gives you a change to review it first. It even works with images (and probably files). What a glorious macro!
</post>
I’ve always tried to run my systems and applications vanilla—as few customisations as possible, even down to backgrounds and themes and light-mode vs dark-mode. This has always paid off—I can repave or set up a new system and be working in minimal time and cognitive overhead (something I don’t have a lot of…).
I think this is why the idea of a macro pad hasn’t really entered my mind again until lately. I saw it as the ultimate non-vanilla customisation to a system. However, once I started playing with it, I’ve come to realise it’s almost the exact opposite. Sure, I’ve created a MacOS Shortcut, and tweaked a couple of hotkeys in some apps to make things easier, but the vast amount of the automation is within the Stream Deck configuration itself. That means I can just back up the configuration and take it with me to a new machine along with the hardware if I need to.

The Stream Deck has very quickly become an extension of my work environment. I have it just on the left of my keyboard, and a Kensington SlimBlade Trackball on the right. The SlimBlade has four buttons, I’ve configured the top two to navigate from desktop to desktop. So when I’m moving around and doing busy work to get ready for deeper work, I find myself with one hand on the deck and another on the trackball, like some Flight of the Navigator setup.
It feels incredibly efficient, but at the same time, I can live without it. I can still unplug the laptop and work from a cafe—it isn’t as fun, there is more clicking around, but I can get my work done pretty well. The Stream Deck makes things faster and easier—much like my trackball or my split keyboard. And just like those other peripherals, I love it, and I feel like I’ve made a great investment.